Thursday, November 1, 2012

Halloween Costumes - DIY or Not?

I remember trick-or-treating in the same costume year after year that my mother had made me as a kid. I longed to be a princess, a witch, anything but that dreaded clown. But each year I stepped into that oh so colorful jumpsuit, slapped on that loud and CrAzY wig, and headed out into the night in search of cavity-ridden goodies!!

Fast forward 30 years and now I have two kids who want to be something different every year and it's always something I can't find in stores. Btw, why do costumes have to cost so dang much?? We're big Disney fans and just had to have Disney costumes for the kiddies when they were little. So for the first 5 or so years my kids grew into and then out of Rolie Polie Olie & Zowie Olie costumes and Lightning McQueen & Sally costumes.  As expensive as they were, getting a number of years out of those costumes was worth it.

So now the question remains... do you make your own costumes or put the money out hoping to get a few years out of them? It would be nice if kids didn't grow so fast or their favorite things of today didn't change with the wind. But I've found the best way to keep up with my kids is to put together costumes from reusing old clothes or adding embellishments here and there. Like adding a simple Woody hat and sheriff badge to a plaid shirt or Mickey Ears to a Minnie Mouse dress we found at a thrift store....


One year my kids decided to be Nick Jr.'s Max and Ruby. For Max I just found some overalls and a striped shirt at the local Goodwill. For Ruby a yellow dress and purple blouse, also from the Goodwill, painted with orange and green fabric paint did the trick. Adding finishing touches with some face paint and headband bunny ears I bought at the Target $1 spot over Easter and violla! ...


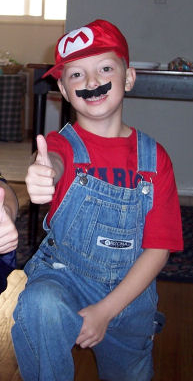
My son was becoming a HUGE video game expert and would be Mario or Luigi every year if he could, but I thought back to my own "clown" years and tried to steer him in another direction. But the following Halloween he insisted he had to be Mario, which turned out to be super easy to make.  I just reused the overalls from his Max costume (thank goodness they still fit!!), found a red t-shirt from his dresser, attached white felt cut out in the M shape to a red 50 cent baseball cap, and cut out a wavy mustache from black felt and stuck it on his upper lip.... Mama Mia!! It's me Mario!!..


The year after that I gave in and purchased $40 a piece costumes (OUCH!!). My son wanted to be Mario again, but settled for Toad.  My daughter was thrilled to find a Princess Peach costume to match. 


As fun as it is to dress up, it's way too expensive to purchase new costumes every year so I hoped they could get some mileage out of these costumes like they did with the Disney ones.  No such luck!! Halloween night my daughter stepped on the front of her dress as she was trick-or-treating and ripped the ENTIRE bottom half of the dress right off! (Crappy craftsmanship!!) And my son grew faster than a weed and had out grown his costume before summer even came around. 

So now I was back to stirring up my creative juices to make one-of-a-kind costumes for my kids. Problem is, it seems each year my kids keep coming up with characters that aren't that simple to make!!  Last year my daughter wanted to be Sharon Osbourne from America's Got Talent.  Are you kidding me??? A black jacket from the Goodwill, the America's Got Talent logo ironed onto a white tank top, a colorful wig, and some jewels were the best I could do. She loved it!!


And for my son.. who better to be than Justin Bieber? A kid who sings.. how hard can that be to create a costume for? Well, let me tell ya... it was HARD!! I couldn't find an affordable white denim jacket to save my life and it took 4 trips to several Goodwill's to find white jeans. It was easier to find Waldo than it was finding a purple hoodie. Just when I was about to give up I found one at Walmart. They also had a brown wig I combed over to have the 'Bieber do' in his face (which drove him crazy all night). The kids' toy box already had a plastic echo microphone and some play sunglasses. Now I just needed purple shoes - the most difficult item to find!! On my final trip to the Goodwill I somehow managed to find a pair of hightop sneakers that actually fit my son!! I stopped at Lowes on the way home to get some purple spray paint and sprayed the heck out of those bad boys!!  Although it was a pain trying to find every detail for this costume, the reaction my son got from other trick-or-treaters was amazing and well worth the effort!!

This year I asked my kids months in advance what they wanted to be for Halloween so I could get a jump on costume creating.  Considering how difficult it was to find all the pieces last year I didn't want to repeat the chaos of running around from store to store trying to find the perfect parts.  But weeks before Halloween neither one of my kids had decided who they wanted to be yet.  UGH!!

We went to Halloween Costume shops for inspiration.  Nothing.  We looked online and in junk mail catalogs for ideas.  Nothing.  About a week before the big night they finally decided upon the Evil Queen from Snow White and Donkey Kong.  REALLY?.. I quit!!  There's no way I'm going to be able to create an Evil Queen dress in less than a week!! And by that time all the decent costumes were gone from the stores and the only ones that were left fit a 2 year old or a dog!!  But then I found a "Gothic Maiden Vampiress" dress shoved all the way in the back of the rack. It was a little too big for my daughter, but when you have days to come up with something you just go with it.  I picked up a red apple from the craft & hobby section for $1 and was going to make "Mirror Mirror" for her to carry as well, but figured it was a safety hazard if she were to accidentally drop it.  She already had a tiara in her 'dress up' closet so her costume was as done as it was going to get.  Now I had to come up with Donkey Kong.


A brown t-shirt and felt hat from the 99 cent store, some 25 cent yellow felt and $2.99 craft fur from Hobby Lobby, a red necktie I already had in my stash, some printed online images, and craft paint completed the supplies needed to create this too cool costume.

First I painted the chest on the t-shirt with ivory craft paint. Then I cut out the DK logo from yellow felt and sewed it onto the red necktie.  Then I stitched the craft fur to the sleeves of the t-shirt, pinned the Donkey Kong printout to the felt hat and shazam!.. Donkey Kong at your service..


My son didn't like wearing the hat, so he decided to go without it, but it didn't take away from the overall look of the costume.  He even met up with some 'friends' while out trick-or-treating who recognized him right away!!


Even though I did buy my daughters dress (for $20), it was another successful Halloween creating original, fun costumes for my kids that didn't break the bank.  It might seem easier and less stressful to just buy costumes from the store each year rather than save a few bucks by making your own, but the ones that get remembered the most are the ones I create for my kids. They enjoy seeing that nobody else has the same costume as them and the reactions and comments from others about how creative or what great ideas their costumes are is priceless in my book.


Saturday, June 23, 2012

DIY Greek Costume - Socrates


What do you do when your daughter comes home from school and says she has to be Socrates for a class project in two weeks and Halloween is still months away?... Well first you panic, then you hyperventilate, and then you eventually pass-out!.. Well, not necessarily in that order!!


What I did was search the web - you can find so many different ideas on the internet!!  What a convenience to be able to Google something and within seconds have what you're looking for!  After viewing several sites in search of Socrates' appearance and attire, I came to the conclusion my daughter was going to have to be bald, grow a beard, and wear some form of a toga costume.  Believe me when I tell you she was not pleased when I informed her of this!!  ... haha   Of course I wasn't going to shave her head or apply hair growth treatment to her face, but having her wear a bald cap.. well..  let's just say I didn't have to go THAT overboard with detail, I mean it was just a class project, not a Broadway production.

And with that in mind, I set off to create a Socrates costume that cost a whopping $4.32!! Here's how I did it....

Costume Supplies: Bed Sheet, Felt, Elastic

I headed off to my trusty Goodwill to find a bed sheet that I could use to make the toga or tunic costume.  It was a little tricky finding an appropriate way to make a male toga for a girl to wear since a lot of chest is typically shown in a male toga.  But I found this pretty cool video tutorial that was really helpful in creating this costume.  I picked up a pastel green Queen sized bed sheet for $4.00 that I thought about cutting in half or sewing together, but I didn't want to have to rip out stitches later or regret cutting it because I probably would re-use it again. (always thinking green!!)

The next step was finding facial hair.  There are a few synthetic beards online thru Party City, but by the look on my daughter's face I could tell I would need to keep looking. What better place to look than on Etsy.com?! There are so many creative and artistic shops on Etsy filled with unique items you can't find anywhere else. Some of the most clever beards I came across were crocheted and yarn beards. My daughter seemed a little apprehensive about wearing one of these, but she did say they were a lot better than the Party City beards. (a glimmer of hope!!)

Then I had a brilliant idea to just make my own. ... like I don't already have enough on my plate!! I was going to need some help with this one and lucky for me I found a couple of tips and tricks on how to create a fake beard online.  This great tutorial was the easiest and most practical way to go and served as the inspiration I needed to get this project moving!  I purchased gray felt at Joanns for about $0.32 and drew a beard onto card stock that I already had at home.  I don't normally use patterns so this part was especially new for me.

Since my daughter wouldn't be dressing up and performing her character until about noon, I had to figure out the easiest way for her to put on the beard independently while she was at school.  The best way was to make it like a mask with an elastic strap in the back.  I found an elastic headband that's been sitting in my hair accessories bin forever, cut it to fit, and attached it to the felt. Applying the mustache so that my daughter could talk like a normal person was quite a nuisance.  But I finally finished and even though I wasn't ecstatic with the overall outcome, it was my first time working with felt and a pattern so I don't think I did too badly.
Next was making the poison.  Not too difficult a task, I simply printed a picture of the poison symbol and taped it to an empty water bottle. 

My daughter felt like a weirdo all dressed up as a famous Greek philosopher, but she practiced her lines like a champ and she did a great job!!  All said and done, I'm not sure I'm ready for the costume business, but I'm always grateful for another chance to strengthen my experience in crafting.


True wisdom comes to each of us when we realize how little we understand about life, ourselves, and the world around us.”  ~ Socrates


Have a Beautiful Day!

Thursday, June 14, 2012

Recycled Necktie Keychains OH MY!!


I’ve been recycling men's neckties into Cell Phone Wristlets for over two years now.  And in making these wristlets, I’ve accumulated quite a large collection of leftover necktie pieces.  I’ve held onto these remnants because I knew one day I would probably create something with them.  There are a few ideas brewing around in my head, but so far I've only had the chance to create a keychain large enough to slip over your wrist.    


My first batch debuted at a craft fair last fall and they were a hit!! I received a lot of compliments about them, so I decided to list a few in my online shop.  I’ve since had several custom order requests for keychains to be made from sentimental family neckties to be given as gifts to various family members. 

But nothing could prepare me for the next request I received.  I was recently asked to create 350 recycled necktie keychain/key fobs for an upcoming marketing campaign through Cumberland Marketing out of Kingsport, TN.  I was honored to be asked, yet worried if I could handle such an order of this magnitude!  I’m a one woman operation and being a full-time mom and part-time student unfortunately doesn’t leave much room for sewing.  But I took on the task anyway and hoped for the best!

This project was HUGE and I realized I wouldn't have enough remnants in stock to fit the order plus it would take a few weeks to get additional keychain hardware shipped in from my supplier.  Great thing for me Cumberland Marketing was offering to supply the ties AND the hardware needed!! WOOT!  (Thank You CM!!)

 A few days later a large box was delivered to my studio. Holy cannoli there were almost 100 ties in that box!! Where would I begin? Was I in over my head?

I figured the easiest direction to head off in was to sort them by color.  As I prepared each tie, I couldn’t help but remind myself what a significant opportunity this was for me and my business.  I was extremely grateful to have been given the chance to partake in this project.


And then I was informed special ties were being expedited for immediate processing to appear in a commercial shoot!! 


Something I made is going to be featured in a real live commercial?!?!?  I almost fainted, but I had a zillion key fobs to create so there was no time for drama!! I finished up the special order and awaited word as to when these oh-so-cute keychains would make their advertising debut.. (so far, no word yet!!) ... :-(
 
Hours turned into days, days turned into weeks and I started to feel the pressure of completing this enormous job in a timely manner.  But I somehow made it through despite taking care of my family and studying for finals and I’m just thrilled my sewing machine was able to hold up too!!

Recycled Necktie MINI Keychain Key Fobs

This entire process was challenging and overwhelming at times, but it was also a wonderful experience that strengthened my crafting ability and improved the belief in myself- that I can do anything (through Christ who gives me strength – Philippians 4:13)


If you have a favorite tie of your own or of a loved one that you’d like made into a keychain/key fob or if you would like to purchase one of my keychains, please visit my online store and I'd be happy to assist you!!

Have a Beautiful Day!

Thursday, May 3, 2012

Quick and Easy 1-Minute Manicure

Spending too much time behind the wheel and not enough time pampering yourself?  Well, how about pampering yourself while you're behind the wheel??  Not when you're driving of course, but the next time you're waiting for the kids to get out of school or for Grandma to get done with her doctor appointment why don't you give yourself a 1-minute manicure?  It's super easy to do and only requires a few essentials.

1-Minute Manicure Supplies: Hand Lotion ~ Nail File ~ Nail Polish

I usually arrive a bit early to pick my kids up from school, mostly to get a good spot in the pick-up line, but it also gives me quiet time to read, meditate, or empty my head onto a tablet before chaos ensues once my car fills with kids.  But today I decided to use this time to finally fix some nails I had chipped last week that I've been meaning to take care of since they keep snagging on things!

Once parked, I began to file my nails and smooth over the chipped areas.  Then I applied a travel size hand lotion that I always keep in the car.  At that point I realized I was giving myself a "mini" manicure. I finished by applying the clear top coat and thought this is a great idea to share with any busy mom who's always on the go!!  Just keep a nail file, some hand lotion, and your favorite nail polish in your glove box and the next time you have a minute to spare give yourself a 1-minute manicure!!


It's an instant pick-me-up and a well deserved treat!!  ENJOY!!

Have a Beautiful Day!

Wednesday, December 21, 2011

Recycled Necktie Wristlet - How Do You Make One?

"How do you make your necktie wristlets?  I really want to know!!"
"Can I have the instructions to make a tie wristlet?"
"Is there a tutorial or instructions available to make these wristlets?"
"Please email me your pattern. Thanks!"

The ORIGINAL Recycled Necktie Wristlet © 2010

I get asked ALL the time how I make my Recycled Necktie Wristlets. The sudden interest to obtain the instructions or pattern to my necktie wristlets has been overwhelming!!  It's amazing to see how popular an idea I came up with almost two years ago has become and I truly appreciate the positive response my wristlets have received!! 

Who would have thought I would create something that others would be so interested in??  It all started in 2010 when my sister asked me to make her something to carry her cell phone and ID in.  She liked the snap wallets I made, but felt they weren't enough.  She wanted a handle, something purse-like.  I did some research and found several different cell phone holders on the market.  Some were cute, some were not, but nothing really jumped out at me.  Until I found a coin pouch made from a necktie.  It wasn't made well, but it would serve as the inspiration I needed to begin creating.  

I have always loved the concept of taking things and turning them into something else, something different than its intended purpose.  So I began experimenting with men's neckties and even though I had NO IDEA what I was doing, I just kept at it.  After one month of breaking several machine needles and pulling lots of hair out in frustration, I finally created my very first necktie wristlet!!  It is now displayed in my studio, like a business's first $1, to remind me of where it all began!!

My FIRST necktie wristlet
I was so proud of myself for not giving up, yet I was scared to try and make another one.  I had no idea how I made the first one, so how could I duplicate what I just did?!  I gave it a go anyway and out came another necktie wristlet... well, purse this time.  I wasn't comfortable with how the wristlet-type handle was coming out so I tried a shoulder strap.  But the necktie wasn't long enough to make the purse hip length.  It was still cute and functional, so I listed it in my online store and was I ever shocked when it SOLD!!!!


I decided to go back to the wristlet-type handle again and my third attempt generated the original design of my Recycled Necktie Wristlet.  It sold within weeks and I knew I was onto something!! Even my picky-pants sister was thrilled with her wristlet so I decided to make one for myself!!  At first, I used mine for trips to Disneyland. It was super easy to carry our Annual Passports and camera around the park instead of a giant bag filled with things I didn't need, especially there!!  Now I use it to carry my cell phone, ID, and a credit card or two instead of that enormous bag I used to lug around everywhere!!  I don't think I'll ever go back to using one of those "luggage" bags again!

My wristlets were quickly becoming a hit, so I decided to enter one of them into NBC's Green Is Universal "ReUser's Guide to Green Living - ART OF ReUSE CONTEST.   Even though I was not a top 10 finalist, the attention my wristlets received since entering this contest has been mind-boggling!!

Green Is Universal - ReUse'rs Guide to Living - Art of ReUse
C O N T E S T    E N T R Y
I've since sold over 100 Recycled Necktie Wristlets and I am truly grateful for the opportunity to create a product that has become so successful! It's such a rewarding feeling to come up with something all your own and have others admire it.

I'm flattered to have had so many requests from people interested in how I make my wristlets, but I cannot provide a pattern or “how-to” instructions because I don't use them. I just make wristlets out of men's neckties, I can't explain how. It’s like Grandma baking in the kitchen. She doesn’t follow a recipe or specific measurements, she just throws in a dash of this and a pinch of that and out comes the most delicious ‘work of art’ you ever tasted!! So the best way to describe how I make my wristlets is this..... I find a vintage or gently used necktie, crank up my favorite radio station (95.9 The FISH), and let God do the rest!!!

I hope that my Recycled Necktie Wristlets inspire you to find other objects to upcycle and give new life to.  Tap into your creative juices and see what different items you can come up with,  that’s all I did! There are plenty of innovative and green products yet to be created. So what are you waiting for??!! Get crafting!!

If you're not sure where to start, I encourage you to look deep within yourself and discover what it is you do best and what makes you truly happy. Keep in mind the ability to craft isn’t for everyone as not everybody is wired to create. But we all have a natural talent; it's finding what comes naturally that’s the challenge!! And whatever it may be, I hope you get the opportunity to do it someday!!

TearfulTouch.etsy.com
If you would like to purchase one of my wristlets, or if you have a favorite tie of your own or of a loved one that you’d like made into a wristlet, please visit my online store at http://tearfultouch.etsy.com and I'd be happy to assist you!! 

Copyright© 2010 - 2012 Tearful Touch® All rights reserved.
The "Recycled Necktie Wristlet 2-Pocket Gadget Holder" is the Intellectual Property of Tearful Touch® and may not be copied, reproduced, displayed, distributed, or sold without express written permission. Product images used in social media communities and platforms is permitted under the Fair Use Doctrine, US Code Title 17, Chapter 1, § 107.

Have a Beautiful Day!

Monday, October 24, 2011

My Craft Fair Booth Makeover

Vending at a Craft Show is pretty much a crap shoot.  There are no guarantees you will sell anything nor can you predict what the weather will be like.  And anyone can just clunk down some merchandise on a table and hope someone will give them money for it.  But setting up your vending space to attract the potential customer is a crucial factor in this business.  There are many "tips" and set-up ideas available online and thousands of people full of advice, which can be helpful (or confusing) for a newbie, but nothing can teach you better than just getting out there and doing it yourself!!

My first vending experience was earlier this year at a local Earth Week Expo.  I had no idea what to expect and didn't really have a concept as to how I would set up my booth even though I spent hours researching various set-up ideas.  I purchased a table at Costco and figured that was a good start.  The Expo graciously provided vendors with a canopy, table, and a chair so all I had to really worry about bringing was my product.  But being it was my first time, I worried about way more than that!  I continued to research different ideas and tried to come up with something "my own".....

My First Craft Fair
I positioned the tables into an "L" shape and covered them with two flat sheets I picked up from Walmart.  I was thrilled to find a vintage sewing machine off of Craigslist that I could use as a prop.  To give the illusion of height, I placed boxes under the sheets ....  Not very "trendy" or eye catching is it?... You can't even tell what I'm selling ... It's "my own" alright!!, haha  :) 

Surprisingly I saw some traffic, made a few sales, and got LOTS of positive feedback on my merchandise, but it didn't turn out quite as I had hoped.  I mean I was grateful for the experience to have been around other vendors to learn from and it was super cool to be a part of an eco-friendly event that I'm glad I didn't scare myself out of going to, but I knew I would have to "dress it up" some more if I were to do another show.

And low and behold I was asked to attend another little festival a few months later.  You'd think I would have learned from my first mistake... I mean show, and try to have a little more organization or flow in my second attempt....


My second Craft Fair
No such luck!!... This time I borrowed a table in addition to the one I owned and purchased my own canopy from Walmart.  I kept the "L" shaped layout the same and somehow thought that adding some picture frames filled with product information would help soften things up.  But the overall look was still cluttered with no sense of order or purpose.

Although I did make a few sales, I had even less traffic than before.  And I ended up spending what I earned on the other vendors that were there!  Again, grateful to have participated in this little shindig and for the practice in setting up, but I just knew that if I were to do this again, I would definitely have to make some major changes if I wanted to see things pick up.

There were a few events on the horizon, but I still didn't have a plan to create a new set up nor was I prepared with enough product so I didn't apply for any of them.  A few more months went by and I finally decided to attend a Fall Boutique not far from where I lived.  I had a few set up designs in my head, but nothing concrete.  I worked on increasing my product line and before I knew it, the event was days away!!

I think I had about 6 hours of sleep the entire week leading up to the craft show!  The hardest part was constructing my set up pieces while trying to create enough product in time for the show.  There just didn't seem to be enough time in each day to get it all done!  I had to make new table cloths, preferably fitted ones.  I also wanted to make curtains for the corners of the canopy and a backdrop along the rear of the booth.  I needed a stand to display my neckties, but had no idea what to buy or make.  ... Tick tock!! ...


Tah-Dah!! ... My new and improved Craft Fair Set-up

Third time's a charm, right?!?!?!  It's like night and day!!  I borrowed two tables in addition to the one I owned and decided to change the layout of the tables to create a more inviting atmosphere.  My table cloths were made from two brand new shower curtains I found at the Goodwill for $8 each that retail for $25 each at Target!

I used one of the green sheets I already had and cut it into strips, hemmed it up, and made four corner curtains out of it. The other green sheet was used as a table cloth for the smaller table toward the back of my booth.  I purchased another flat sheet in brown and cut pieces from it to sew along the sides of the shower curtain to make the fitted table cloths.  My husband built a shelf for one of the tables which I created a slipcover for from the same sheet.  The remaining pieces were used to cover the Necktie Wristlet stands my husband made from scrap wood and PVC pipes.  

Recycled Necktie Wristlets

Ivory curtain panels and a few storage baskets were also found at the Goodwill.  I somehow MacGyver'ed the curtains together to make a "backdrop" for the rear of the canopy, but once I started setting up the booth I decided to split them up and have one on each side to kind of break up the closeness of my neighboring vendors.  (Guess I'll have to make some "walls" before the next show!)

Traffic was light, but this event brought in the most sales for me so far!!  I received TONS of positive comments regarding the cleverness of my products, and even suggestions for new ones.  And I only spent my earnings on lunch and a face painting for my daughter!!

It was exciting to go home with extra cash in my pocket and rewarding to have my merchandise appreciated by such wonderful customers.  Completely renovating my set-up was a refreshing experience, one that has inspired me to attend more craft shows and has shown me that I am capable of creating anything I put my mind to.  Now my booth is an organized and inviting environment that shows some personality and flair, a far cry from what my set-up was like before, and I did it all for under $50!! 

If you are preparing for your first Craft Show (or attending your 90th), may I suggest you just have fun with it.  Enjoy the experience and know that as your craft evolves over time, so will your products and how you display them.

Have a Beautiful Day!

Wednesday, October 5, 2011

Got Junk Mail? - Recycle It!!

Got Junk Mail ??...

I remember going out to the end of the driveway to my grandparents mailbox and collecting their mail for them everyday.  It was a job I was proud of (unless there were bills inside), but I don't remember them complaining much about receiving too much junk mail.  Today, that's all we seem to get in our mailbox!! From credit card offers to catalogs, junk mail fills up our mailboxes on a daily basis only to be dumped in the trash to then fill up our landfills.

Sure, you can sign up for one of those services that promises to rid you of all junk mail, but it will still come.  So accept it, and recycle it into something USEFUL!!!  Here's how....

If you don't already own a paper shredder, I would highly recommend you go get one.  Now, you don't have to go break the bank by buying a "Top-of-the-Line" model, just find one that will ... idk ... shred paper! ...

My 6 sheet max strip cut shredder

Once you've got that shredder plugged in and ready to rock, grab all that piled up junk mail and shred your little heart out!! This could even be a great activity to keep your kids busy (Adult Supervision is recommended of course!!)  So the next time you need to pack up that gift you're sending to Aunt Marge or Grandma Jean, you can simply stuff some shredded junk mail into your shipping box to keep the items from shifting around in transit.

And it's more eco-friendly than those styrofoam peanuts or inflated plastic pouches because the shredded paper can simply be tossed into the recycling bin once the package has been opened!  Or it can even be stored in reused plastic grocery bags until it's ready to be re-used again!!
 
Use shredded junk mail as shipping or moving filler

With Christmas right around the corner, you should start shredding now so you'll have plenty of filler to ensure your gifts will arrive safe and sound to their recipients this holiday season.  You know, this might also be a great way to cushion breakables while moving!!

Or how about making your own paper from the shredded strips??!!   You could also take those fake credit cards they include and give them to the kids to "pretend play" with (age appropriately, of course).  I use mine as props for my online merchandise photos.  Wow!, the "re-uses" of junk mail are endless!! :)
 
Re-use Credit Card & Gift Card offers
 
So there you have it, a few easy peasy ways to recycle all that junk mail you never stop getting!!

Have a Beautiful Day!